Introduction
OAuth 2 is an authorization framework that enables applications to obtain limited access to user accounts on an HTTP service, such as Facebook, GitHub, and DigitalOcean. It works by delegating user authentication to the service that hosts the user account, and authorizing third-party applications to access the user account. OAuth 2 provides authorization flows for web and desktop applications, and mobile devices.
This informational guide is geared towards application developers, and provides an overview of OAuth2 roles, authorization grant types, use cases, and flows.
Let's get started with OAuth Roles!
Code link:
Demo link :
Best link :
Project of social media login with gmail is working as follow :
OAuth Roles
OAuth defines four roles:
Resource Owner
Client
Resource Server
Authorization Server
We will detail each role in the following subsections.
Resource Owner: User
The resource owner is the user who authorizes an application to access their account. The application's access to the user's account is limited to the "scope" of the authorization granted (e.g. read or write access).
Resource / Authorization Server: API
The resource server hosts the protected user accounts, and the authorization server verifies the identity of the user then issues access tokens to the application.
From an application developer's point of view, a service's API fulfills both the resource and authorization server roles. We will refer to both of these roles combined, as the Service or API role.
Client: Application
The client is the application that wants to access the user's account. Before it may do so, it must be authorized by the user, and the authorization must be validated by the API.
Abstract Protocol Flow
Now that you have an idea of what the OAuth roles are, let's look at a diagram of how they generally interact with each other:
Abstract Protocol Flow
Here is a more detailed explanation of the steps in the diagram:
The application requests authorization to access service resources from the user
If the user authorized the request, the application receives an authorization grant
The application requests an access token from the authorization server (API) by presenting authentication of its own identity, and the authorization grant
If the application identity is authenticated and the authorization grant is valid, the authorization server (API) issues an access token to the application. Authorization is complete.
The application requests the resource from the resource server (API) and presents the access token for authentication
If the access token is valid, the resource server (API) serves the resource to the application
The actual flow of this process will differ depending on the authorization grant type in use, but this is the general idea. We will explore different grant types in a later section.
Application Registration
Before using OAuth with your application, you must register your application with the service. This is done through a registration form in the "developer" or "API" portion of the service's website, where you will provide the following information (and probably details about your application):
Application Name
Application Website
Redirect URI or Callback URL
The redirect URI is where the service will redirect the user after they authorize (or deny) your application, and therefore the part of your application that will handle authorization codes or access tokens.
Client ID and Client Secret
Once your application is registered, the service will issue "client credentials" in the form of a client identifier and a client secret. The Client ID is a publicly exposed string that is used by the service API to identify the application, and is also used to build authorization URLs that are presented to users. The Client Secret is used to authenticate the identity of the application to the service API when the application requests to access a user's account, and must be kept private between the application and the API.
Authorization Grant
In the Abstract Protocol Flow above, the first four steps cover obtaining an authorization grant and access token. The authorization grant type depends on the method used by the application to request authorization, and the grant types supported by the API. OAuth 2 defines four grant types, each of which is useful in different cases:
Authorization Code: used with server-side Applications
Implicit: used with Mobile Apps or Web Applications (applications that run on the user's device)
Resource Owner Password Credentials: used with trusted Applications, such as those owned by the service itself
Client Credentials: used with Applications API access
Now we will describe grant types in more detail, their use cases and flows, in the following sections.
OAuth 2.0 for Client-side Web Applications
This document explains how to implement OAuth 2.0 authorization to access Google APIs from a JavaScript web application. OAuth 2.0 allows users to share specific data with an application while keeping their usernames, passwords, and other information private. For example, an application can use OAuth 2.0 to obtain permission from users to store files in their Google Drives.
This OAuth 2.0 flow is called the implicit grant flow. It is designed for applications that access APIs only while the user is present at the application. These applications are not able to store confidential information.
Following steps follow to open new api login OpenId and Screte key in google plus account :
1-click on following link :
https://console.developers.google.com/
2-click on create new project link which is avaliable in menu bar ,please follow following image screen shot which is better understand you :
First click on above link then open new dashboard and show as folow :
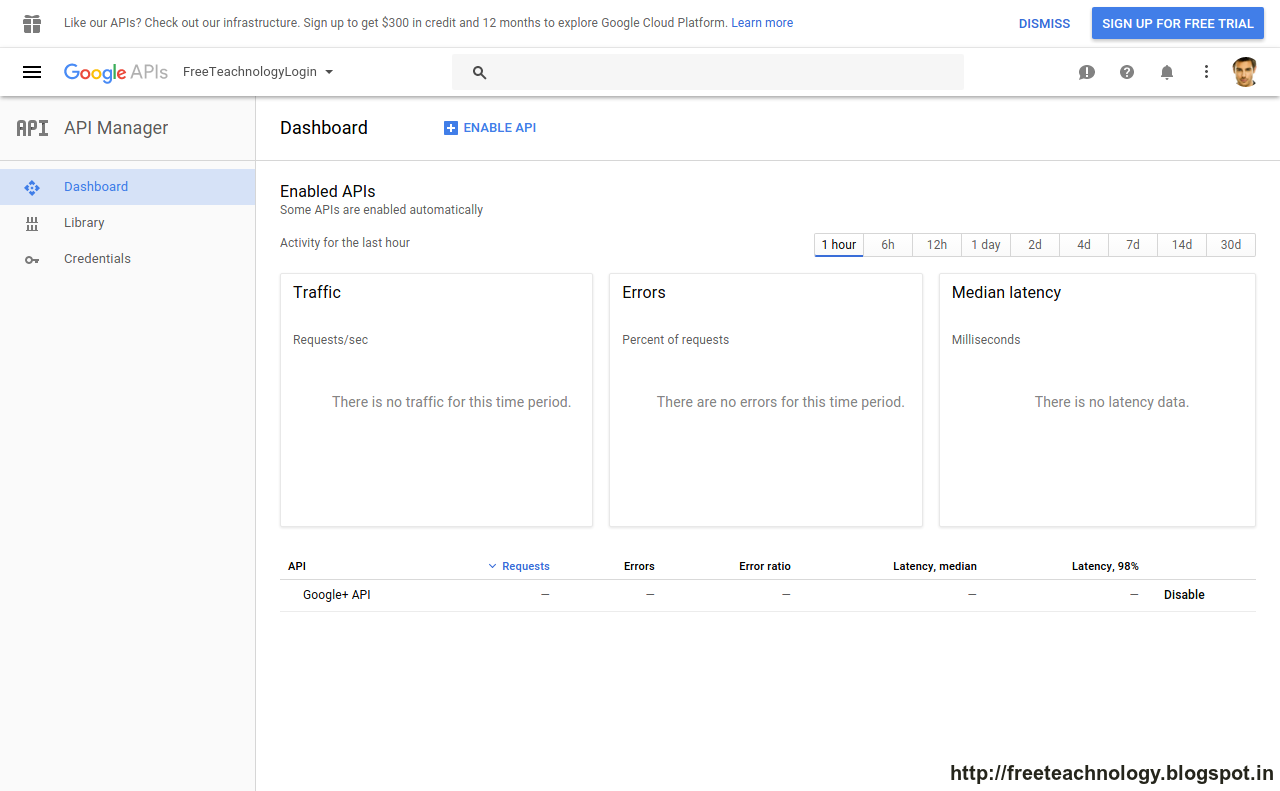
user can create new login id/Openid then click on create new projects link ,

if click on create new project then show model and enter project name and click on create new project link after that show dashboard following option :
following popup show :

if the create on link then show dashboard of project :
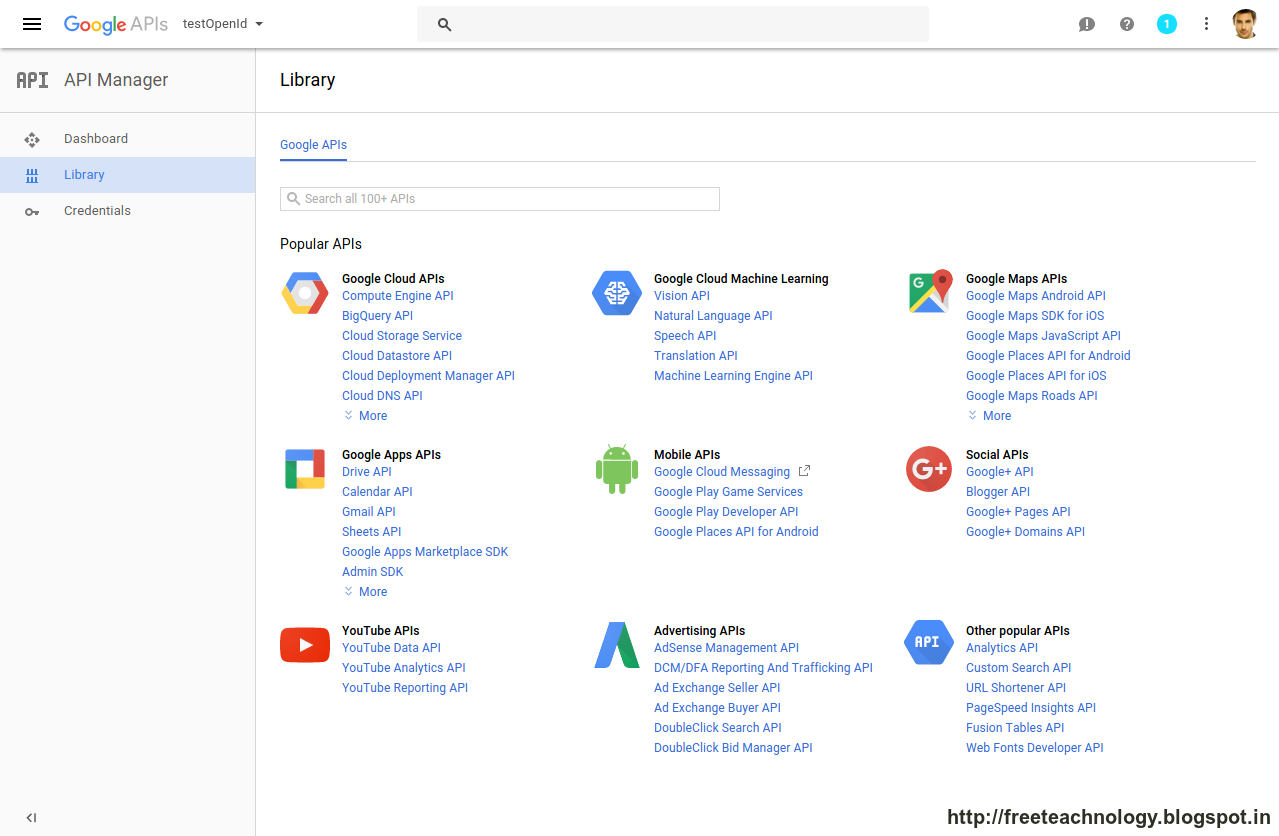
after that click on Google APIs main section and main section option are Google+ API chose option
see below image :
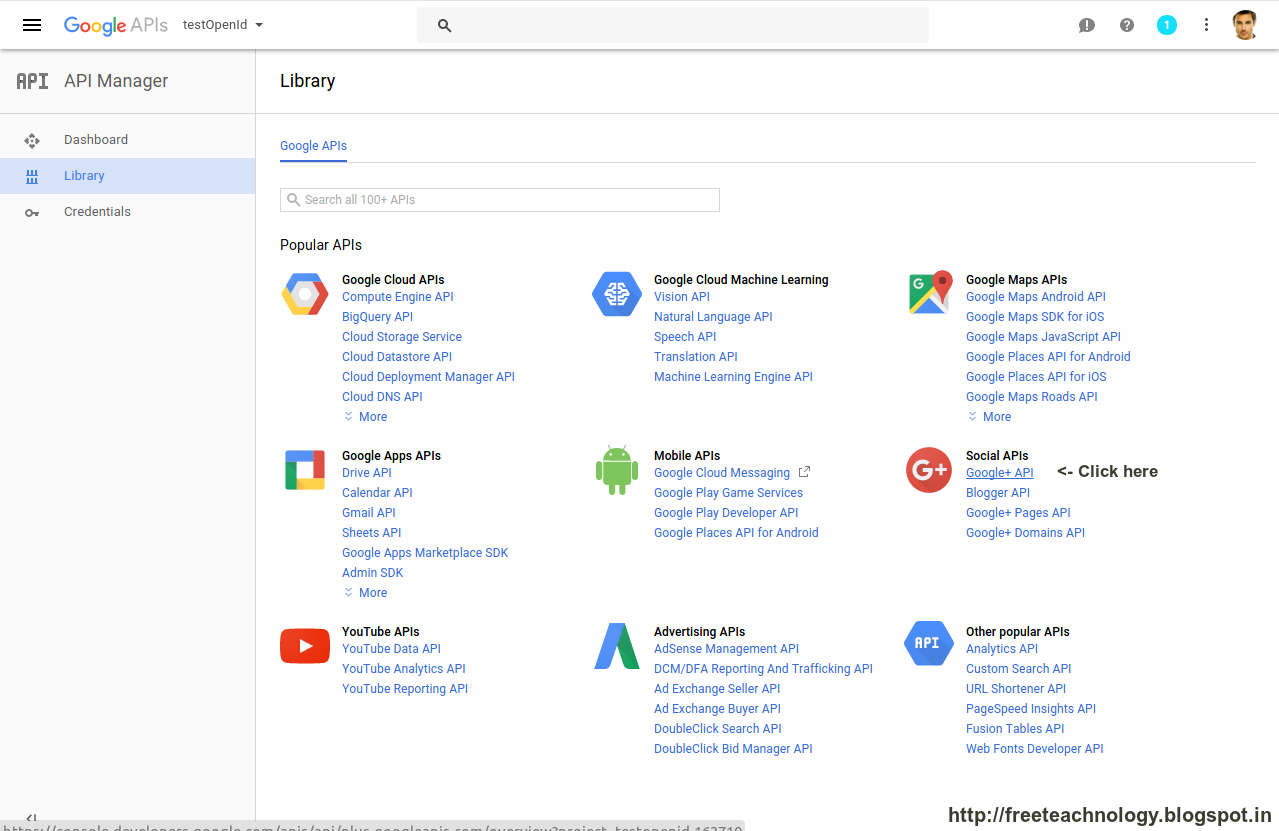
after that click on google+ api then show
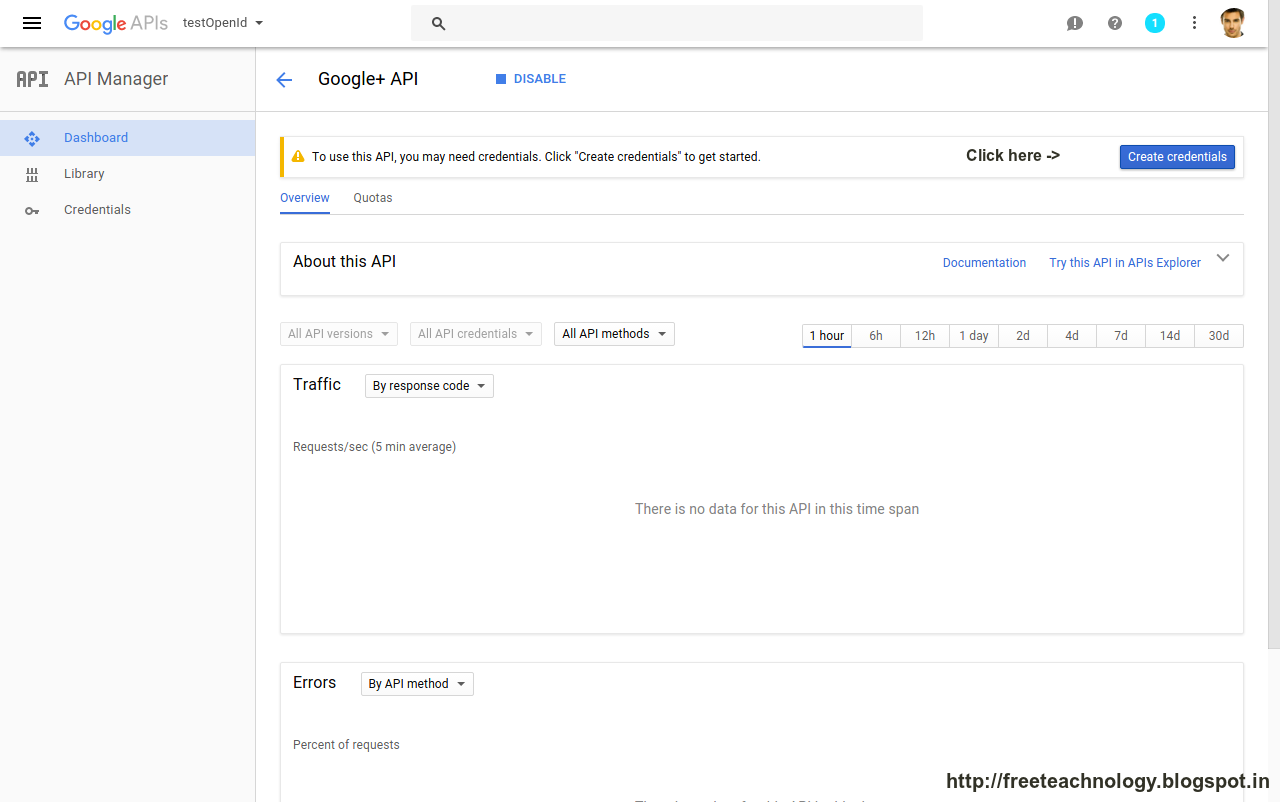
Now click on create credential button then show the dashboard of api chose option
1-Which API are you using?
2-Where will you be calling the API from?
3-What data will you be accessing?
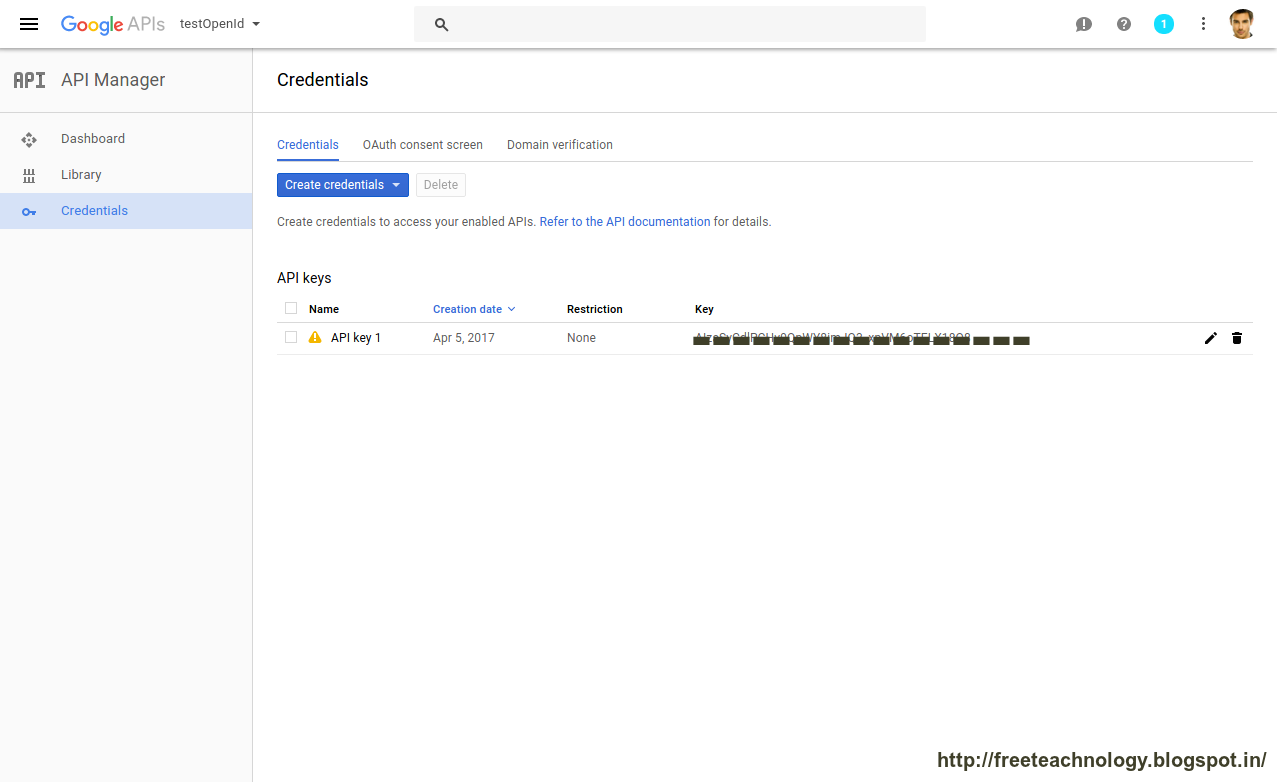
Then click on credential link on, left side menu and select option

create api key then show following message and information.Set redirect url and all this setting if you want .
Please make following folder strcuture and show
1-header.php ;
header file include only link of bootstrap and css and js link :
Code :
<!DOCTYPE html PUBLIC "-//W3C//DTD XHTML 1.0 Transitional//EN" "http://www.w3.org/TR/xhtml1/DTD/xhtml1-transitional.dtd">
<html xmlns="http://www.w3.org/1999/xhtml">
<head>
<meta http-equiv="Content-Type" content="text/html; charset=utf-8" />
<title>Login with Google using PHP</title>
 <link href="https://maxcdn.bootstrapcdn.com/bootstrap/3.3.5/css/bootstrap.min.css" rel="stylesheet">
 <link href="error.css" rel="stylesheet">
 <script src="https://code.jquery.com/jquery-3.1.1.js" integrity="sha256-16cdPddA6VdVInumRGo6IbivbERE8p7CQR3HzTBuELA=" crossorigin="anonymous">
 </script>
 <script src="https://maxcdn.bootstrapcdn.com/bootstrap/3.3.5/js/bootstrap.min.js"></script>
<link href="bootstrap-tour.css" rel="stylesheet">
<script src="bootstrap-tour.js"></script>
</head>
<body>
<!-- start:header -->
<nav class="navbar navbar-default navbar-fixed-top">
<div class="container-fluid" id="freeteachnology">
<!-- Brand and toggle get grouped for better mobile display -->
<div class="navbar-header">
<a class="navbar-brand" href="#">Free Teachnology</a>
</div>
<!-- Collect the nav links, forms, and other content for toggling -->
<div class="collapse navbar-collapse" id="bs-example-navbar-collapse-1">
<ul class="nav navbar-nav">
<li class="active"><a href="#">Home <span class="sr-only"></span></a></li>
<li><a href="#">About us</a></li>
<li><a href="#">Contact us</a></li>
</ul>
</div><!-- /.navbar-collapse -->
</div><!-- /.container-fluid -->
</nav>
2-footer.php :
footer file include shows social media link :
Code :
<!-- Start::footer -->
<footer>
<div class="footer footer-bottom">
<div class="container">
<p class="pull-left"> Copyright © <?php echo date('Y');?>. Design and Develop by - Disuza Jen. </p>
<div class="pull-right">
<ul class="nav nav-pills payments">
<li>
<a target="blank" href="https://www.facebook.com/profile.php?id=100011576444095">
<i class="fa fa-facebook"></i></a>
</li>
<li>
<a target="blank" href="https://plus.google.com/116407769803493244155">
<i class="fa fa-google"></i></a>
</li>
<li>
<a target="blank" href="https://twitter.com/disuzajen1">
<i class="fa fa-twitter"></i></a></li>
<li>
<a target="blank" href="https://plus.google.com/116407769803493244155">
<i class="fa fa-link"></i>
</a>
</li>
</ul>
</div>
</div>
</div>
<!--/.footer-bottom-->
</footer>
<!-- End::footer -->
<link rel="stylesheet" type="text/css" href="//maxcdn.bootstrapcdn.com/font-awesome/4.1.0/css/font-awesome.min.css">
</body>
</html>
3-gpConfig.php :
gp config file show google or include google login id and screte key ,
$clientId = '<id>'; //Google client ID
$clientSecret = '<key>'; //Google client secret
$redirectURL = '<url>'; //Callback URL
full code here :
<?php
session_start();
//Include Google client library
include_once 'src/Google_Client.php';
include_once 'src/contrib/Google_Oauth2Service.php';
/*
* Configuration and setup Google API
*/
$clientId = '609713888812-4oucsqbgiaodkvbq840grlg2a7oocv0o.apps.googleusercontent.com'; //Google client ID
$clientSecret = 'FDLIGcIx-3NzH9DlUFM8NOZB'; //Google client secret
$redirectURL = 'http://freeteachnology.hol.es/Google+/index.php'; //Callback URL
//Call Google API
$gClient = new Google_Client();
$gClient->setApplicationName('Login to Free Teachnology');
$gClient->setClientId($clientId);
$gClient->setClientSecret($clientSecret);
$gClient->setRedirectUri($redirectURL);
$google_oauthV2 = new Google_Oauth2Service($gClient);
?>
4-index.php :
Index file include header.php,gpConfig.php files and other html tags and html code :
Code :
<?php
include('header.php');
include_once 'gpConfig.php';
include('checkGoogleUser.php');
?>
<div>
<br><br><br>
<div class="cleafix"></div>
<div class="container">
<div class="alert alert-info">
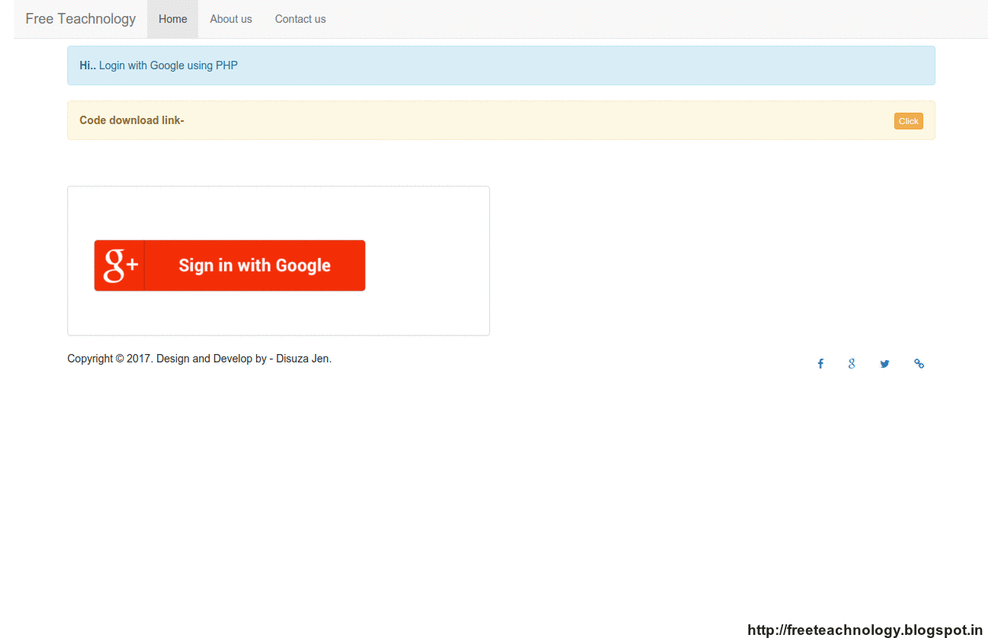
<strong>Hi..</strong> Login with Google using PHP
</div>
<div class="alert alert-warning">
<a href="https://drive.google.com/open?id=0BxmTZPVcu72fQ1FyMFNjd1gwMlU" class="btn btn-xs btn-warning pull-right" target="blank();">Click</a>
<strong> Code download link-</strong>
</div>
<br><br>
</div>
<div class="container">
<div class="row">
<div class="col-md-6">
<div class="panel panel-default">
<div class="panel-body">
<?php if(!empty($userData)){ ?>
<div class="row">
<div class="col-xs-12 col-sm-8">
<h2><?php echo ucfirst($userData['first_name']).' '.ucfirst($userData['last_name']);?></h2>
<p><strong>Email: </strong> <?php echo $userData['email'];?> </p>
<p><strong>Gender: </strong><?php echo (!empty($userData['gender'])?$userData['gender']:'-');?></p>
<p>
<strong>Locale: </strong><?php echo (!empty($userData['locale'])?ucfirst($userData['locale']):'-');?>
</p>
<p>
<strong>Logged in with: </strong>Google
</p>
<p>Logout from <a href="logout.php">logout</p>
</div><!--/col-->
<div class="col-xs-12 col-sm-4 text-center">
<?php
$img='';
$img='<img src="'.$userData['picture'].'" alt="" class="center-block img-circle img-responsive">';
echo $img;
?>
<ul class="list-inline ratings text-center" title="Ratings">
<li><a href="#"><span class="fa fa-star fa-lg"></span></a></li>
<li><a href="#"><span class="fa fa-star fa-lg"></span></a></li>
<li><a href="#"><span class="fa fa-star fa-lg"></span></a></li>
<li><a href="#"><span class="fa fa-star fa-lg"></span></a></li>
<li><a href="#"><span class="fa fa-star fa-lg"></span></a></li>
</ul>
</div><!--/col-->
</div>
<!--/row-->
<?php } else {
$authUrl = $gClient->createAuthUrl();
echo $output = '<a href="'.filter_var($authUrl, FILTER_SANITIZE_URL).'">
<img src="images/glogin.png" alt=""/></a>';
}
?>
</div>
</div>
<!--/panel-->
</div>
</div>
</div>
</div>
<link href="//maxcdn.bootstrapcdn.com/font-awesome/4.2.0/css/font-awesome.min.css" rel="stylesheet">
<?php include('footer.php');?>
Now above index.php file check get all record form api in$userData variable and get information set in html page and show on index.php files otherwise show login image of google plus.
i hope that you like google plus login api work and enjoy my code, if you like please comment and share
Comments